4 Diy Christmas Stocking Ideas To Make!
This diy come from www.writefromkaren.com . These would make great childrens stockings. After they are sewn together, let them decorate them to the childs liking. Good luck!
Here are some fun and cute stocking ideas.
In fact, wouldn’t these be fun to scale down and put on packages? OR, maybe you know a child who has a birthday around Christmas? You could scale them down and make cute little goodie bags, er, stockings to take home.
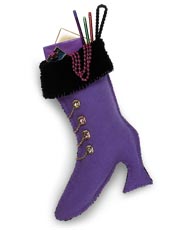
Fancy Boot Stocking
This boot was made for stuffing, and that’s just what Santa will do this Christmas Eve.
CRAFT MATERIALS:
Scissors
2 pieces of purple felt, each 24 by 15 inches
2 pieces of black faux fur, each 24 by 15 inches
Long sewing pins
Large-eye sewing needle
Purple embroidery floss
Costume jewelry buttons and chains (sold at many fabric stores)
Clear tape
9 inches of black twist cord
Time needed: About 2 to 3 Hours
1. The Basic Stocking: Click here to download the fancy boot stocking pattern.
2. Cut 1 boot shape from each piece of the purple felt and 1 from each piece of the black fur. Be sure to cut the fur boots so the toes point in opposite directions with the fur sides up.
3. Pin together the boots with the fur boots on the inside, furry sides in, and the purple boots on the outside.
4. Using the floss, whipstitch around the edges, sewing the boots together. Leave the top edges unsewn.
5. At the top, sew together the front 2 edges, then the back 2.
6. Fold down the top to make a cuff.
7. The Trimmings: Use floss to sew the buttons and chains to the boot.
8. Tape the ends of the cord to keep them from fraying, then sew the cord to the stocking for hanging.
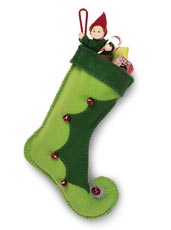
Elf Boot Stocking
Here’s a whimsical stocking in gaji of Santa’s hardworking helpers.
CRAFT MATERIALS:
Scissors
2 pieces of light green fleece, each 24 by 20 inches
3 pieces of dark green felt, each 24 by 20 inches
Long sewing pins
Large-eye sewing needle
Dark green embroidery floss
Red jingle bells, 4 medium and 1 large
Clear tape
9 inches of red twist cord
Fiberfill
Time needed: About 2 to 3 Hours
1. The Basic Stocking: Click here to download the elf boot stocking pattern.
2. Cut 1 boot shape from each piece of the light green fleece
3. Cut a decorative shape from 1 piece of the dark green felt for the front of the stocking and 1 stocking shape from each of the remaining 2 pieces of the felt.
4. Place a light green boot on top of a dark green boot, pin the decorative shape on top, and use the floss to whipstitch (see page 131) around the inner edge of decorative shape through both boots.
5. Pin together all 4 boots with the dark green boots on the inside.
6. Using the floss, whipstitch around the edges, sewing the boots together. Leave the top edges unsewn.
7. At the top, sew together the front 2 edges, then the back 2.
8. Fold down the top to make a cuff.
9. The trimmings: Use the floss to sew the medium red bells to the decorative shape and the large red bell to the toe tip.
10. Tape the ends of the cord to keep them from fraying, then sew the cord to the stocking for hanging.
11. Stuff the curly toe of the boot with fiberfill to keep it from flopping over when the stocking is empty.
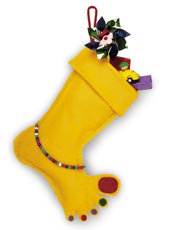
Bare Foot Stocking
Add a touch of color to the season with this stocking that celebrates every kid’s favorite footwear — none!
CRAFT MATERIALS:
Scissors
4 pieces of gold felt, each 21 by 20 inches
Red felt and red embroidery floss
Green felt and green embroidery floss
Purple felt and purple embroidery floss
Long sewing pins
Large-eye sewing needle
Gold embroidery floss
Pony beads
Clear tape
9 inches of red twist cord
Time needed: About 2 to 3 Hours
1. The Basic Stocking: Click here to download the bare foot stocking pattern.
2. Cut 1 bare foot shape from each piece of the gold felt .
3. Cut 5 circles from the colored felts for the toenails.
4. Place one foot on top of another and pin the toenails in place.
5. Using the matching floss, whipstitch (see page 131) around the edges of each toenail, sewing through both feet.
6. Pin all 4 feet together and use the gold floss to whipstitch around the edges, sewing the feet together. Leave the top edges unsewn.
7. At the top, sew together the front 2 edges, then the back 2.
8. Fold down the top to make a cuff.
9. The Trimmings: Thread pony beads onto a 24-inch piece of colored floss, wrap it around the ankle, and tie together the ends.
10. Tape the ends of the cord to keep it from fraying, then sew it to the stocking for hanging.
Ballet Slipper Stocking
“Nutcracker†nuts, for one, will dance with joy over this dainty stocking.
CRAFT MATERIALS:
Scissors
2 pieces of white felt, each 24 by 12 inches
3 pieces of pink felt, each 24 by 16 inches
Long sewing pins
Large-eye sewing needle
Pink embroidery floss
White embroidery floss
2 ½ yards of 7/8 -inch pink ribbon
Clear tape
9 inches of white twist cord
Time needed: About 2 to 3 Hours
1. The basic stocking: Click here to download the ballet slipper stocking pattern.
2. Cut 1 stocking shape from each piece of the white felt.
3. Cut 2 shoe shapes from 1 piece of the pink felt and 1 stocking shape from each of the remaining 2 pieces of pink felt.
4. Lay out the pink stockings, toes pointing in opposite directions, with a white stocking on top of each one.
5. Pin a pink shoe on top of each white stocking.
Stitch diagram 6. Using the pink floss, whipstitch (see page 131) along the inner edge of each shoe, sewing through the pink and the white felt. Leave the outside edges unsewn.
7. Pin together the stockings so the shoes are on the outside, then whipstitch together the layers using the white floss along the white edges of the stocking and the pink floss for the shoes. Leave the top unsewn.
8. At the top, sew together the front 2 edges, then the back 2, with the white floss.
9. The Trimmings: Cut the ribbon in half, tie it in a bow, and then sew the knot to the stocking.
10. Crisscross the loose ribbon down and around the leg of the stocking and tack the ends flush to the top of the heel.
11. Tape the ends of the cord to keep them from fraying, then sew the cord to the stocking for hanging.
Tips:
A Stitch for All Stockings
Thread your needle with a length of floss and knot one end. Begin sewing by pushing the needle up through the underside of the fabric and then out the top. Loop the needle back under the fabric and repeat the stitch.
Here are some fun and cute stocking ideas.
In fact, wouldn’t these be fun to scale down and put on packages? OR, maybe you know a child who has a birthday around Christmas? You could scale them down and make cute little goodie bags, er, stockings to take home.
Fancy Boot Stocking
 |
This boot was made for stuffing, and that’s just what Santa will do this Christmas Eve.
CRAFT MATERIALS:
Scissors
2 pieces of purple felt, each 24 by 15 inches
2 pieces of black faux fur, each 24 by 15 inches
Long sewing pins
Large-eye sewing needle
Purple embroidery floss
Costume jewelry buttons and chains (sold at many fabric stores)
Clear tape
9 inches of black twist cord
Time needed: About 2 to 3 Hours
1. The Basic Stocking: Click here to download the fancy boot stocking pattern.
2. Cut 1 boot shape from each piece of the purple felt and 1 from each piece of the black fur. Be sure to cut the fur boots so the toes point in opposite directions with the fur sides up.
3. Pin together the boots with the fur boots on the inside, furry sides in, and the purple boots on the outside.
4. Using the floss, whipstitch around the edges, sewing the boots together. Leave the top edges unsewn.
5. At the top, sew together the front 2 edges, then the back 2.
6. Fold down the top to make a cuff.
7. The Trimmings: Use floss to sew the buttons and chains to the boot.
8. Tape the ends of the cord to keep them from fraying, then sew the cord to the stocking for hanging.
Elf Boot Stocking
 |
Here’s a whimsical stocking in gaji of Santa’s hardworking helpers.
CRAFT MATERIALS:
Scissors
2 pieces of light green fleece, each 24 by 20 inches
3 pieces of dark green felt, each 24 by 20 inches
Long sewing pins
Large-eye sewing needle
Dark green embroidery floss
Red jingle bells, 4 medium and 1 large
Clear tape
9 inches of red twist cord
Fiberfill
Time needed: About 2 to 3 Hours
1. The Basic Stocking: Click here to download the elf boot stocking pattern.
2. Cut 1 boot shape from each piece of the light green fleece
3. Cut a decorative shape from 1 piece of the dark green felt for the front of the stocking and 1 stocking shape from each of the remaining 2 pieces of the felt.
4. Place a light green boot on top of a dark green boot, pin the decorative shape on top, and use the floss to whipstitch (see page 131) around the inner edge of decorative shape through both boots.
5. Pin together all 4 boots with the dark green boots on the inside.
6. Using the floss, whipstitch around the edges, sewing the boots together. Leave the top edges unsewn.
7. At the top, sew together the front 2 edges, then the back 2.
8. Fold down the top to make a cuff.
9. The trimmings: Use the floss to sew the medium red bells to the decorative shape and the large red bell to the toe tip.
10. Tape the ends of the cord to keep them from fraying, then sew the cord to the stocking for hanging.
11. Stuff the curly toe of the boot with fiberfill to keep it from flopping over when the stocking is empty.
Bare Foot Stocking
 |
Add a touch of color to the season with this stocking that celebrates every kid’s favorite footwear — none!
CRAFT MATERIALS:
Scissors
4 pieces of gold felt, each 21 by 20 inches
Red felt and red embroidery floss
Green felt and green embroidery floss
Purple felt and purple embroidery floss
Long sewing pins
Large-eye sewing needle
Gold embroidery floss
Pony beads
Clear tape
9 inches of red twist cord
Time needed: About 2 to 3 Hours
1. The Basic Stocking: Click here to download the bare foot stocking pattern.
2. Cut 1 bare foot shape from each piece of the gold felt .
3. Cut 5 circles from the colored felts for the toenails.
4. Place one foot on top of another and pin the toenails in place.
5. Using the matching floss, whipstitch (see page 131) around the edges of each toenail, sewing through both feet.
6. Pin all 4 feet together and use the gold floss to whipstitch around the edges, sewing the feet together. Leave the top edges unsewn.
7. At the top, sew together the front 2 edges, then the back 2.
8. Fold down the top to make a cuff.
9. The Trimmings: Thread pony beads onto a 24-inch piece of colored floss, wrap it around the ankle, and tie together the ends.
10. Tape the ends of the cord to keep it from fraying, then sew it to the stocking for hanging.
Ballet Slipper Stocking
 |
“Nutcracker†nuts, for one, will dance with joy over this dainty stocking.
CRAFT MATERIALS:
Scissors
2 pieces of white felt, each 24 by 12 inches
3 pieces of pink felt, each 24 by 16 inches
Long sewing pins
Large-eye sewing needle
Pink embroidery floss
White embroidery floss
2 ½ yards of 7/8 -inch pink ribbon
Clear tape
9 inches of white twist cord
Time needed: About 2 to 3 Hours
1. The basic stocking: Click here to download the ballet slipper stocking pattern.
2. Cut 1 stocking shape from each piece of the white felt.
3. Cut 2 shoe shapes from 1 piece of the pink felt and 1 stocking shape from each of the remaining 2 pieces of pink felt.
4. Lay out the pink stockings, toes pointing in opposite directions, with a white stocking on top of each one.
5. Pin a pink shoe on top of each white stocking.
Stitch diagram 6. Using the pink floss, whipstitch (see page 131) along the inner edge of each shoe, sewing through the pink and the white felt. Leave the outside edges unsewn.
7. Pin together the stockings so the shoes are on the outside, then whipstitch together the layers using the white floss along the white edges of the stocking and the pink floss for the shoes. Leave the top unsewn.
8. At the top, sew together the front 2 edges, then the back 2, with the white floss.
9. The Trimmings: Cut the ribbon in half, tie it in a bow, and then sew the knot to the stocking.
10. Crisscross the loose ribbon down and around the leg of the stocking and tack the ends flush to the top of the heel.
11. Tape the ends of the cord to keep them from fraying, then sew the cord to the stocking for hanging.
Tips:
A Stitch for All Stockings
Thread your needle with a length of floss and knot one end. Begin sewing by pushing the needle up through the underside of the fabric and then out the top. Loop the needle back under the fabric and repeat the stitch.


Comments
Post a Comment